
Hey there everyone!
Christmas is edging ever so closer, and Kate and I thought why don’t we all get a little bit creative and festive by creating some Christmas crafts. So I present to you, today’s post, Christmas Crafts. The first half of the post is all of wonderful Kate’s amazingness and she shall be teaching us all how to create such adorable paper Christmas trees. In the second half, I shall be taking you through making a festive card. Now, over to Kate!
3D Origami Christmas Tree
Note: I only did this once before (like Christmas of 2015) so I’m no expert but I did have fun with this. 😀
Materials & tools I used:
1 sheet of 9” by 12” oslo paper (or more if you will make a bigger Christmas tree with more layers)
Scissors (or a cutter if you want uber-precision cuts)
Blue gouache paint that dried up in my palette (optional)
The Kate how-to:
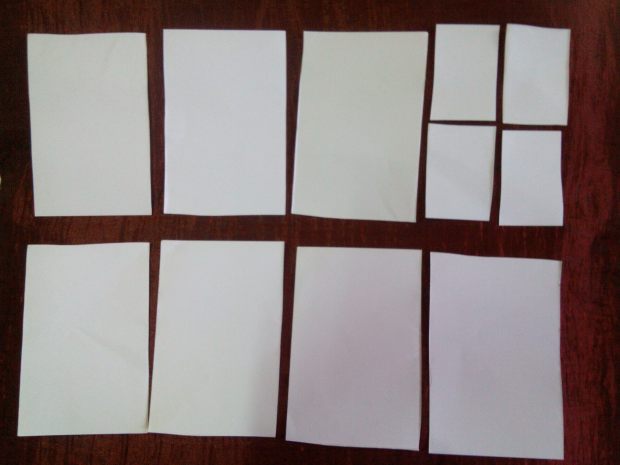
- Fold the oslo paper into 32 pieces. I divided and cut up 8 pieces and then divided and cut each of those into 4 pieces because folding the oslo paper into 1/32 immediately may end up messy. You can also use construction papers. I used oslo just because I wanted a white tree.
- Fold each piece lengthwise like you see in the pic below.


- Then fold the edges to the center like so.

- Fold the outer corners and fold that little tab so you’ll have a perfect triangle. Or in my case a not-so-perfect triangle.

- Fold the triangle in half so that those folded tabs are inside like so

Do this to all your 1/32 pieces of paper

Don’t they look like a flock of birds here?
- Now for the assembling part. Put two triangles together side by side and insert one piece between them like I did below.


- I made three layers for my tiny tree. The top layer has two rows with three pieces for each row, the middle has two rows with five pieces each and the bottom layer has two rows with eight pieces each row.

- Put them in a bamboo stick layer by layer. If you have a Styrofoam board, you can also use that for a stand. I added up a little touches of blue gouache at the tips and viola! It is done.

FESTIVE CHRISTMAS CARDS:

Above, minus the glue stick, are all the resources you shall be needing to create a simple yet effective Christmas card for a loved one. However, I must state, the inspiration for the ideas came from online sites *cough pinterest and google images cough*.
Instructions:

First begin by folding up your piece of paper or card to form the universally recognised card shape. Then draw on a pair of reindeer eyes and two antlers. This may take a while if you’re a perfectionist like me, but once you go over it in a brown marker, the antlers will look much better. Once the outline is sketched out in pencil, grab some red paint and dab it onto your index finger. Now press the finger down approximately where the nose of the reindeer would be.

Don’t forget to grab a black gel pen and colour around the pupil of the reindeer!

With your selection of colour paints, keep dabbing paint on your fingers, and printing circular bauble shapes below the antlers. After all your baubles have been printed on, grab a biro pen and gently draw the bauble string up to the antler to create the hanging effect.

Take a piece of green paper and cut out rectangles in varying lengths.

Take these rectangles and fold them in a way it resembles the picture above. Fold one end of the rectangle a tiny bit, then flip it, fold it again a tiny bit, and keep folding it until you use up all the paper and get a bouncy rectangle.

If you would like to make your card more colourful, you can line the inside of the card with colour paper too. Otherwise, begin sticking your springy rectangles inside the card horizontally, and equally spaced apart. If you desire a 3D effect, create a stairwell impression when gluing the rectangles on.

Now glue the other end of the rectangle to the remaining side of the card. Close the card and squash it shut to make it stick properly.

And voila, your card is complete!

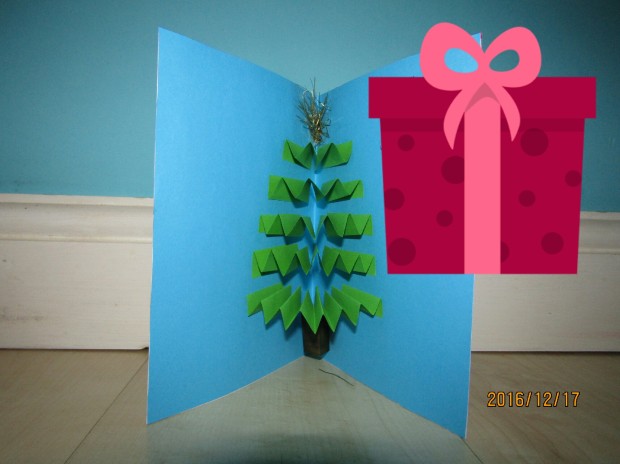
All that is left is to write your personal message inside. As you can probably guess, I forgot to take a photograph before I wrote my message in, so I’ve had to place a cute looking emoji over the writing to rescue my anonymity.
Thank you so much for stopping by today – me and Kate appreciate it so much and we want to wish you a very happy December. Speaking of the wonderful Kate, you guys should check out her recent blog post titled An Artsy Student’s Christmas Wishlist – I think it’s rather fitting with today’s post. Oh, and I can’t end this post without gushing over her stunning art instagram account which you can awe over here.
And that’s a wrap for today’s post. I hope you enjoyed it, and if you want to keep up to date with more of my Blogmas posts, please stop by the follow and subscribe button. You can also check out the previous post Winter photography stroll .
Keep smiling beautifuls


Ohmigosh your card is soooo cute! I love the reindeer in front and the 3D Christmas tree inside! 💕💕💕
LikeLiked by 1 person
Awwww thank you so much 💕 I guess my card must have stole a little cuteness from your Christmas tree 😉
LikeLike
That was amazing!!! I’m totally gonna try to do those!! XD XD I loved this post so much!!
Great job! XD
LikeLiked by 1 person
Aw thank you 💕 let me know how it goes
LikeLiked by 1 person
YASSS I WILL XD
LikeLiked by 1 person
This was a really cute craft! Time to bring out my glue and scissors, now I need an excuse for why I’m doing Christmas crafts in January….
LikeLiked by 1 person
😂😂😂 maybe the weather makes it feel like Christmas…
LikeLiked by 1 person